How to Build a Reliable Compressed-Air Setup for Automotive Painting in Melbourne, Victoria
November 13, 2026
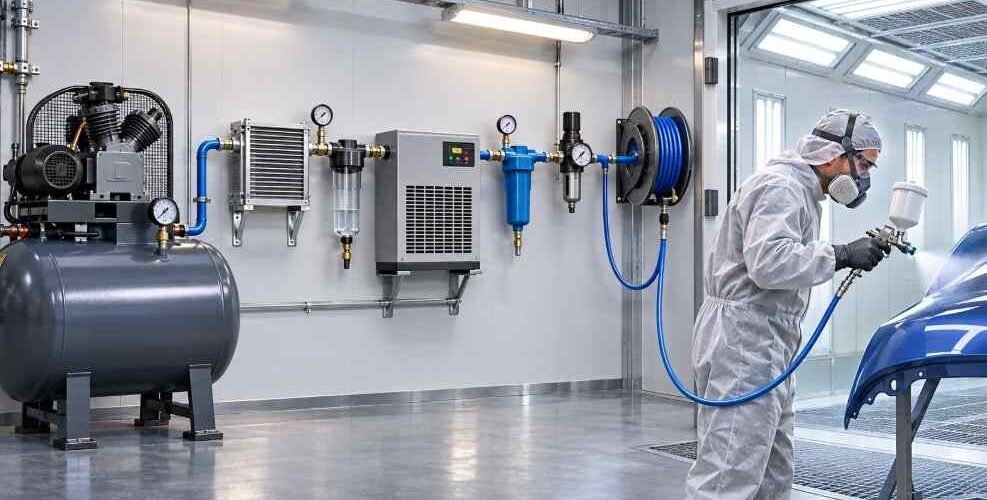
For vehicle restorers, home garage painters, and trade workshops across Melbourne and wider Victoria, a dependable air supply is one of the foundations of a good paint finish. This air compressor painting guide is a useful starting point, but the best results come from looking beyond the compressor itself and planning the complete air path to the spray gun.
Melbourne conditions can change quickly, and a workshop that feels dry in the afternoon may still have moisture sitting in an air receiver or hose after a cool morning. A practical setup accounts for airflow demand, pressure stability, moisture control, hose restrictions, and safe spray-area practices before paint reaches a vehicle panel. This preparation is particularly valuable when applying basecoat and clearcoat systems, where a small interruption in air quality or pressure can become visible in the final finish. Planning the system before buying components can also help avoid spending money on a powerful compressor while retaining restrictive hoses, unsuitable couplers, or inadequate filtration.
Why Air Quality Matters
A compressor is only one component in an automotive painting system. The gun, regulator, filter stages, couplers, hose condition, and spray area all influence how paint atomizes. If working pressure falls during a pass, the fan pattern and atomization can change. If water, oil, or debris reaches the gun, the coating can be contaminated, and the job may need sanding and repainting.
Think of compressed air as a consumable used in every coat. It needs to arrive at the gun with the pressure and cleanliness required by the gun and coating manufacturer. A large tank or high-pressure number cannot compensate for restricted fittings, saturated filters, or an undersized compressor pump. Clean air also supports repeatability: once a suitable gun setup and pressure have been established, the painter can concentrate on gun distance, overlap, flash times, and coating technique instead of continually correcting an unstable spray pattern. Keeping the air supply consistent is therefore as important as setting the gun correctly at the start of the job.
Match the Compressor to the Spray Gun
Start with the spray gun’s technical information. Check its air consumption, recommended inlet pressure, nozzle size, and minimum hose length. Air consumption may be expressed in CFM, SCFM, or liters per minute. The essential comparison is between the gun’s required airflow and the compressor’s delivered airflow at the required operating pressure.
Maximum PSI is not the same as usable painting capacity. A compressor may reach a high pressure in its receiver yet struggle to maintain adequate flow when a full-size HVLP or compliant gun is held open. A small touch-up gun used for occasional repairs usually needs less air than a full-size gun applying basecoat or clear across repeated panels. When comparing equipment, use the compressor’s stated delivered-air figure at a pressure relevant to the gun rather than relying on displacement, tank volume, or a headline maximum-pressure figure. Leaving some airflow capacity beyond the gun’s normal requirement provides a practical margin for pressure losses, normal wear, and changing workshop conditions.
Allow for other air tools
If a workshop operates a dual-action sander, blow gun, or another spray gun simultaneously, calculate the likely combined demand. The compressor must support tools that may operate simultaneously, rather than the demand of a single tool considered in isolation. It is also sensible to avoid using high-demand air tools while laying down a critical coat unless the system has been selected for that combined load. Even a brief pressure drop can affect consistency across a large panel or create an unnecessary interruption during a spraying session.
Choose the Right Compressor THow to Build a Reliable Compressed-Air Setup for Automotive Paintingype
Reciprocating piston compressors are commonly suited to intermittent work, smaller repair jobs, and home or light-trade workshops. They can be a sensible choice when spraying is occasional, and the pump has time to recover between tasks. Check the unit’s duty cycle, noise level, ventilation needs, and service requirements.
Rotary screw compressors are designed for sustained air demand and can suit busy body shops where air is used throughout the day. They require a larger initial investment and proper servicing, but they may be a better fit when several operators, spray booths, or pneumatic tools require a steady supply.
Oil-lubricated compressors can be durable for workshop use, but their air treatment system must manage possible oil carryover. Oil-free units reduce one potential source of contamination, although they still require proper intake filtration, moisture control, and maintenance. Regardless of compressor type, locate the unit where it can draw in cleaner air and where service tasks such as draining the receiver, inspecting belts or fittings, and changing filters can be performed without difficulty.
Consider Tank Size and Duty Cycle
The receiver tank stores compressed air and provides a buffer during short periods of demand. It does not create additional pump capacity. A larger receiver may reduce rapid cycling and provide more time for moisture to condense, but the compressor still needs enough output to recover while spraying continues.
- Spot repairs and trim pieces may suit a compact system paired with a low-consumption gun.
- Repeated panel work needs stronger airflow delivery and recovery capacity.
- Full resprays usually place greater demand on the complete air system.
- Constant running, excessive heat, or failure to recover between passes can indicate an undersized or poorly ventilated setup.
Duty cycle matters because a compressor that runs continuously near its limit can run hotter, leaving little reserve for the next cycle. Give the unit the ventilation and rest period specified by its manufacturer, especially in enclosed garages or during longer painting jobs. A receiver drain fitted at the lowest point of the tank also makes routine moisture removal easier and more consistent.
Control Moisture, Oil, and Dust
Compression heats air. As that air cools in the receiver, pipework, and hoses, moisture can condense and travel downstream. This is why a single inexpensive water trap near the compressor is rarely a complete painting solution, particularly during humid periods or long spraying sessions.
A practical filtration path usually includes regular receiver draining, a main water separator, a coalescing filter where oil aerosol control is required, and a final regulator and filter near the gun. Higher-volume or humidity-sensitive work may also justify the use of a suitably specified refrigerated or desiccant dryer. Replace filter elements according to the manufacturer’s instructions, because a neglected filter can restrict airflow and lose effectiveness. Where possible, allow hot compressed air to cool for some distance before it reaches the main moisture separator, as this can increase the opportunity for liquid water to separate from the air. Keep filter bowls visible and accessible so accumulated water or damage is noticed before a painting session begins.
Size Hoses and Fittings Correctly
Pressure loss often occurs between the tank and the gun. Long, narrow hoses, small couplers, sharp bends, leaks, and clogged filters all add restriction. The tank gauge may appear normal, even as the gun receives insufficient pressure when the trigger is pulled.
- Use the hose’s internal diameter recommended for the spray gun.
- Keep the final whip hose clean, flexible, and free from damage.
- Use fittings capable of supplying the gun’s airflow demand.
- Minimize unnecessary hose length, kinks, and adapters.
- Check couplers and connections for leaks before each painting session.
Dedicate a clean hose to the final paint application where practical. Hoses used around sanding, mechanical repairs, or dirty workshop floors can collect contaminants on their exterior and may be more likely to transfer dust near freshly prepared panels. Route the hose so it does not drag through overspray, rub against sharp edges, or catch on the vehicle while the painter moves around it.
Create a Safer Melbourne Workspace
Automotive coatings, solvents, and spray mist can present fire, inhalation, and skin-contact risks. Position the compressor so its intake is away from vehicle exhaust, overspray, sanding dust, and solvent vapors. Keep ignition sources away from areas where flammable products are mixed, stored, or sprayed.
When using two-pack products or coatings containing isocyanates, follow the coating safety data sheet and the Victorian guidance for safely spraying isocyanate paints. Effective ventilation, correctly selected respiratory protection, suitable gloves, eye protection, and maintained equipment are essential controls, not optional finishing touches. Do not assume that a dust mask provides appropriate protection from paint vapors or spray mist. Review the safety data sheet for every coating, hardener, thinner, and cleaning product being used, and keep solvent-soaked rags and open containers managed to reduce unnecessary vapor exposure and fire risk.
Test Before Spraying
Test the complete setup under real load before moving to a vehicle. Drain the receiver and filters, inspect hoses and fittings, then set the gun pressure as specified by the gun and coating instructions. Pull the trigger fully and check the gauge while air is flowing. Spray a test pattern onto cardboard or a spare panel and look for fan distortion, uneven atomization, water spots, or oily marks.
Use this test to confirm that the regulator setting remains stable during sustained trigger time, not just during a short burst of air. If the pattern changes after a few passes, stop and determine whether the cause is pressure loss, a blocked filter, moisture, a gun cleanliness issue, or an incorrect gun adjustment before applying material to the vehicle.
Maintain the System
Consistent maintenance protects both the equipment and the finish. Drain condensation after use or at the end of the shift; inspect filter bowls and elements; check oil levels on lubricated models; clean the gun after every session; and inspect hoses for cracks or soft sections. Record service dates for filters, oil, belts, drains, and safety components. A reliable Melbourne painting setup is not defined by one expensive component. It is built through correctly matched airflow, clean air treatment, safe operation, and routine checks.